
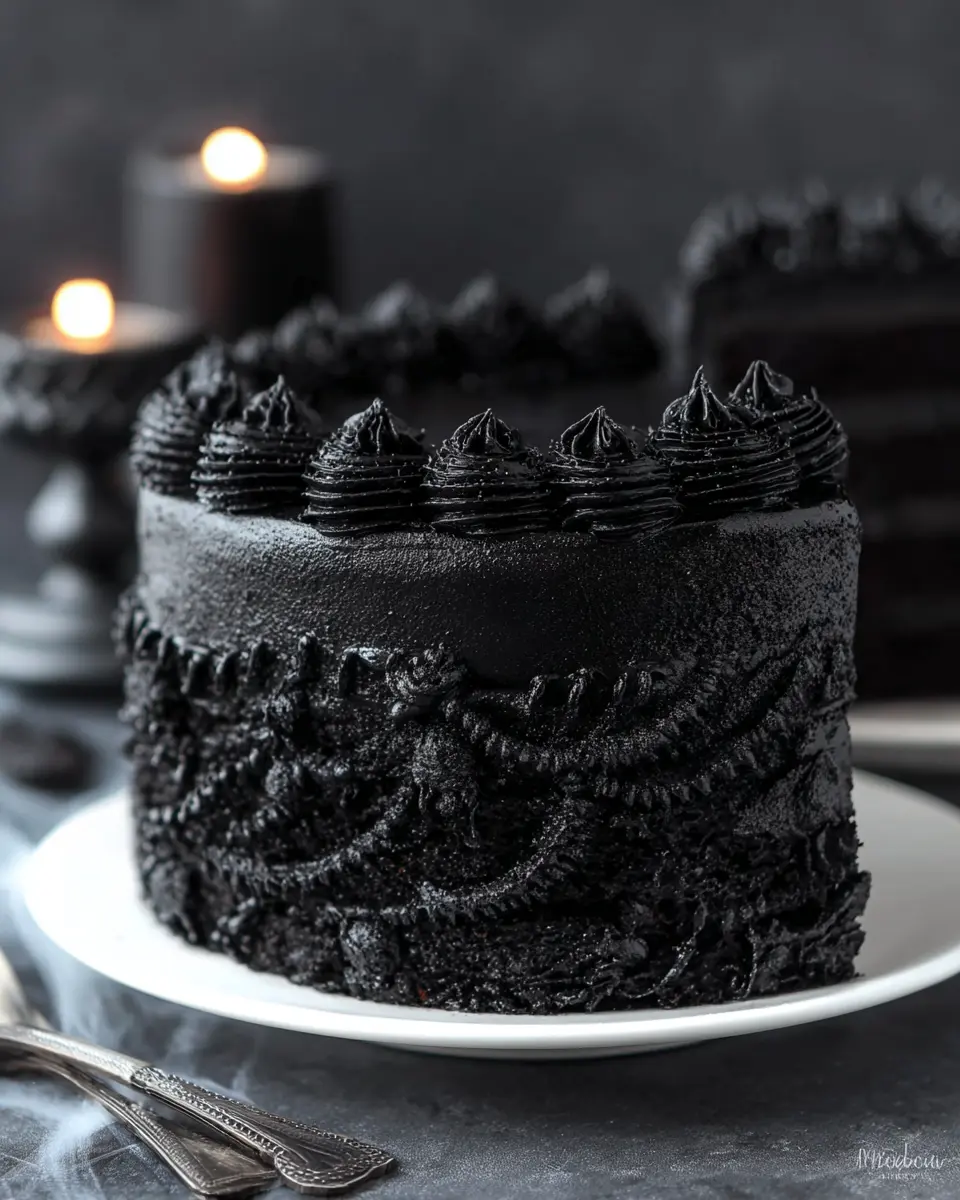
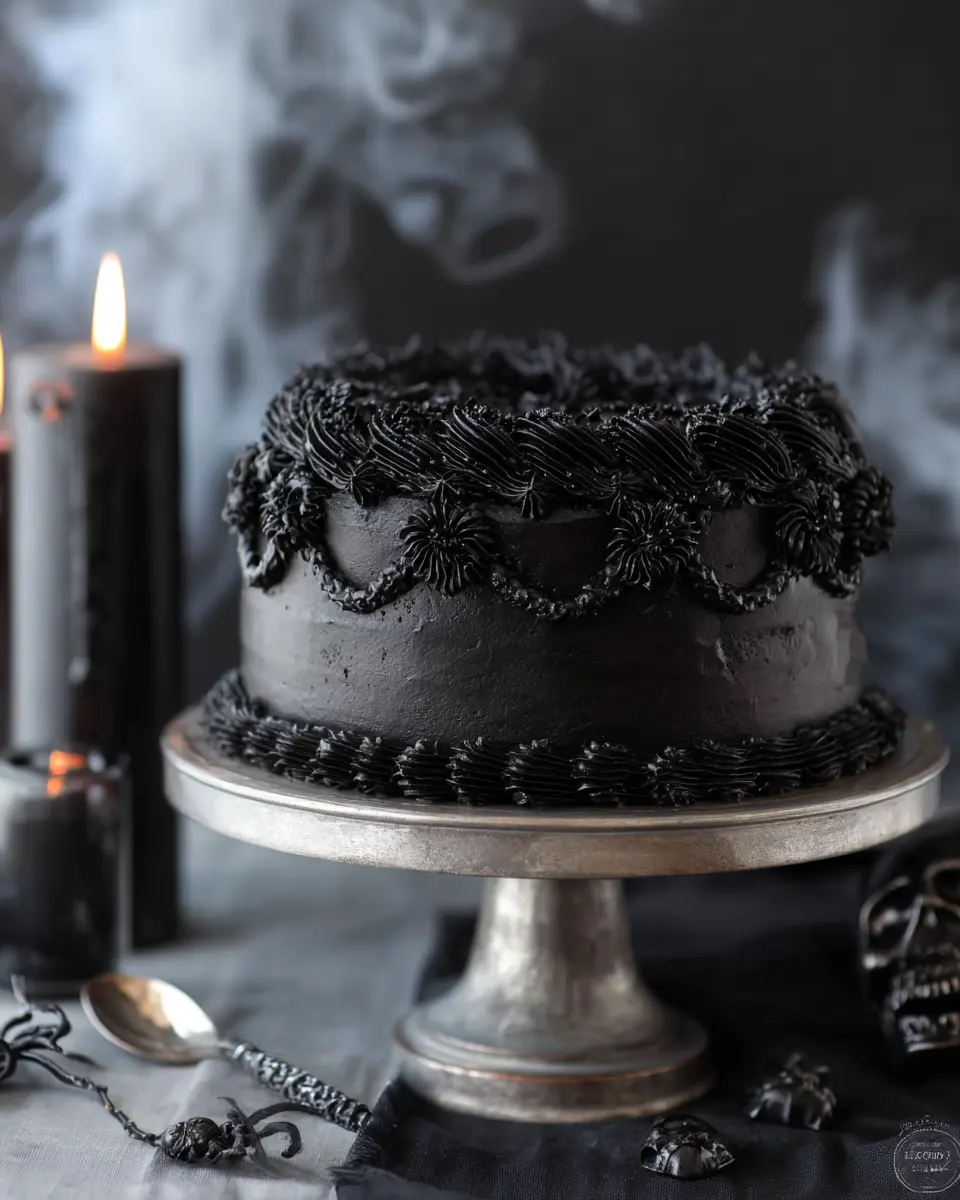
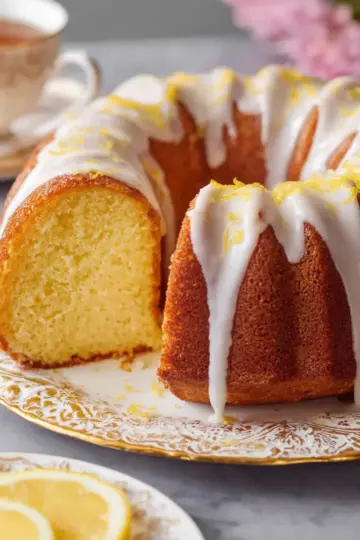
Introduction to Spooky Black Velvet Cake
When it comes to delightful desserts that celebrate themes like Halloween or gothic gatherings, a spooky black velvet cake truly stands out. This cake is a twist on the traditional red velvet, but instead of vibrant red, it offers a deep, mysterious black hue that captures the imagination — and taste buds! Whipping up this cake not only delights your guests but also adds a touch of whimsy to your festivities.
Why choose a spooky-themed cake? A cake like this is perfect for:
- Engaging Presentation: Its striking black color creates a captivating visual that can serve as the centerpiece of your event.
- Fun Flavor: The rich cocoa flavor combined with a velvety texture makes each slice a treat. Everyone loves a cake that bursts with flavor!
- Ideal for Celebrations: Whether it's Halloween or a birthday party for a friend who loves the unconventional, this cake sets the right mood.
Moreover, turning your baking into a spooky experience can be a fun bonding event with family or friends. Get ready to create laughter and delicious memories as you dive into the delightful world of spooky black velvet cake. Don’t forget to check out expert opinions on baking techniques to elevate your skills!
Ingredients for Spooky Black Velvet Cake
Creating a spooky black velvet cake is all about assembling the right ingredients that contribute to its rich flavor and dark allure. Let's break down what you'll need to make this delightful treat and its accompanying frosting.
Key Ingredients for the Cake
- 2 Cups (265g) all-purpose flour: The base that gives the cake its structure.
- 1 ⅔ Cups (340g) granulated sugar: Sweetness balance is key, helping to create a tender crumb.
- ⅔ Cup (80g) black cocoa powder: This ingredient gives the cake its deep color and unique flavor.
- 2 teaspoon baking soda and 1 teaspoon baking powder: Essential for achieving the perfect rise.
- ½ Cup (120ml) vegetable oil: Adds moisture and richness to the cake.
- 2 large eggs: Vital for binding the ingredients together.
- 1 Cup (240ml) full-fat buttermilk: A must for tenderness and flavor—check out this homemade buttermilk recipe for a quick fix!
- Hot coffee or hot water: Enhances the chocolate flavor, making it irresistible.
Key Ingredients for the Frosting
For the spooky decor, you’ll need:
- 2 Cups (452g) unsalted butter: The foundation of creamy, luscious buttercream.
- 5 Cups (600g) powdered sugar: Sweetens the frosting and gives it structure.
- 1 Cup (112g) black cocoa powder: Again, this adds that spooky black hue to your frosting.
- Milk and vanilla: Just enough to make it smooth and delicious!
With these ingredients, you'll be well on your way to crafting a spooky black velvet cake that will impress your friends and elevate any gathering! For more ideas on enhancing your cake, read about using extra dark black cocoa from high-quality sources like King Arthur Baking. Happy baking!
Step-by-step preparation of Spooky Black Velvet Cake
Making a spooky black velvet cake is not just about baking—it's an experience that fills your kitchen with warmth and Halloween spirit. Let’s walk through the steps to create this deliciously dark dessert!
Preheat the oven and prepare the pans
Start by preheating your oven to 350°F (175°C). This step is crucial for ensuring your cake bakes evenly. While the oven is heating, prepare your pans: you can use either three 6-inch or two 8-inch cake pans. Lightly spray the sides with cooking spray and fit the bottoms with circles of wax or parchment paper for easy removal later.
Combine dry ingredients
In the bowl of a stand mixer, combine the following dry ingredients to build the base of your cake:
- 2 cups all-purpose flour
- 1 ⅔ cups granulated sugar
- ⅔ cup black cocoa powder
- 2 teaspoon baking soda
- 1 teaspoon baking powder
- ½ teaspoon salt
Mix these on low for about 30 seconds. This initial mix helps blend the dry ingredients thoroughly and avoids clumping when you add the wet ingredients.
Mix in wet ingredients
Now it's time to add the wet ingredients. Lower the mixer speed and incorporate these into the dry mix:
- ½ cup vegetable oil
- 2 large eggs (room temperature)
- 1 ½ teaspoon pure vanilla extract
- 1 cup buttermilk (room temperature, see notes for DIY)
Once everything is combined, gradually add 1 cup of hot coffee or hot water. This sounds unusual, but it helps make the cake incredibly moist! Mix on medium speed until the batter is smooth and runny—don't worry, it's supposed to be thin!
Bake the cake layers
Pour the batter into your prepared pans, filling them no more than ⅔ full. Bake in your preheated oven for 32-36 minutes until a toothpick comes out clean. Patience is key here; let the layers cool completely before you even think about frosting them. Rushing may spoil that perfect texture you’ve worked hard to achieve!
Prepare the black buttercream
While your spooky black velvet cake layers are cooling, whip up your black buttercream. Continuing in your stand mixer, whip 2 cups of unsalted butter on medium until creamy. Gradually add 5 cups of powdered sugar and sift in 1 cup of black cocoa powder. Finally, add 4 tablespoons of room temperature milk, 2 teaspoons of vanilla extract, and a pinch of salt. Mix on low until fully combined, and don't forget to scrape down the bowl as needed!
Assemble the cake
Once your cake layers are completely cooled, it’s time to assemble! If they’ve domed, gently level them. Place your first layer on a cake board, spread a generous amount of black buttercream, and stack the next layer. Repeat until all layers are stacked. Finish with a crumb coat—a thin layer of buttercream all around the cake to seal in crumbs. Chill the cake for about 30 minutes to help the layers set before you apply the final coat and design with your remaining buttercream.
Now you’re all set to proudly present your spooky black velvet cake! Enjoy crafting this seasonal treat that not only tastes amazing but also looks delightfully festive. Happy baking!

Variations on Spooky Black Velvet Cake
Gluten-free black velvet cake
Craving a spooky black velvet cake but need a gluten-free option? No worries! Simply swap the all-purpose flour for a gluten-free flour blend. It’s essential to choose a blend that includes xanthan gum for the best texture. Bake as directed, and you’ll still enjoy that rich, dark flavor and delightful moisture that makes this cake so special. Remember to check that all other ingredients, like baking powder and buttermilk, are gluten-free!
Mini spooky black velvet cupcakes
Why not whip up some adorable mini spooky black velvet cupcakes? Bake the batter in a mini muffin tin, and they’ll require just about 15-18 minutes in the oven. Once they’re cool, frost them with that luscious black buttercream and top with festive sprinkles or edible eyeballs. They're perfect for Halloween parties or any gathering where you want bite-sized sweetness!
For more tips on these variations, check out this great resource.
Cooking Tips and Notes for Spooky Black Velvet Cake
Making Your Own Buttermilk
Don't fret if you don't have buttermilk on hand for your spooky black velvet cake! It's super easy to whip up your own. Just mix 1 tablespoon of white vinegar with 1 cup of whole milk. Let it sit for about 15 minutes, and you'll have the perfect tangy substitute ready to go. This homemade buttermilk adds a lovely richness to the cake that you won't want to miss!
Storing the Cake and Frosting
If you're not serving your spooky black velvet cake right away, here’s how to keep everything fresh. The cake layers can be stored at room temperature in plastic wrap for up to two days or frozen for up to two months. For the frosting, keep it in an airtight container at room temperature for one day or in the fridge for up to two weeks. Just make sure to bring it back to room temperature and give it a quick whip before frosting the cake. Don't forget to check out this guide for more cake storage tips!
Serving suggestions for Spooky Black Velvet Cake
Perfect pairings for the spooky cake
The spooky black velvet cake pairs wonderfully with a variety of delicious accompaniments. Try serving it with a dollop of freshly whipped cream or a scoop of vanilla ice cream, which adds a delightful contrast to its rich chocolate flavor. For a drinkable option, consider a spooky-inspired hot chocolate topped with marshmallows. Not only does this combination satisfy your sweet tooth, but it also creates that cozy, festive vibe perfect for Halloween gatherings.
Creative decoration ideas for Halloween
Let your creativity shine with decorations that enhance the spookiness of your black velvet cake. Use edible glitter to give it a magical twinkle or pipe ghostly figures around the base with more black buttercream. For a splash of color, add fondant toppings like pumpkins or witch hats. And if you really want to wow your guests, consider garnishing with candy eyes or creepy crawlies. Remember, the key is to have fun and embrace the festive spirit!
For more decorating ideas, check out this great resource that explores creative cake designs and themes. Enjoy making your spooky creation!
Time Breakdown for Spooky Black Velvet Cake
When it comes to whipping up a spooky black velvet cake, timing is everything! Here’s a quick guide to help you manage your baking process smoothly.
Preparation Time
Getting everything ready for this delicious cake takes about 20 minutes. This includes measuring your ingredients and prepping your cake pans.
Baking Time
The actual baking takes around 32-36 minutes. While you wait, you can start planning your spooky cake décor or even set the mood with some haunted tunes!
Cooling Time
Once your cake layers are out of the oven, they need to cool completely, which usually takes about 1-2 hours. Make sure to be patient—this step is crucial for a perfectly frosted cake!
By effectively managing these times, you'll be on your way to creating a stunning and delicious spooky black velvet cake that will impress all your friends. Happy baking! For more details on how to master each step, check out this fantastic baking guide.
Nutritional Facts for Spooky Black Velvet Cake
When indulging in a slice of Spooky Black Velvet Cake, it's good to know what you're enjoying. Here’s a quick breakdown of the nutritional aspects:
Calories
One slice can pack around 450 calories, making it a delightful treat for special occasions.
Sugar Content
Each slice contains approximately 40 grams of sugar, offering a sweet celebration for your taste buds.
Fats
The cake is rich with roughly 20 grams of fat per slice, primarily from the vegetable oil and butter, adding to its moist texture and flavor.
Enjoying this Spooky Black Velvet Cake is all about balance. With its enticing rich flavors and darker color, it's a perfect dessert for Halloween or any festive gathering. For more baking tips and variations, check out our guides on how to decorate cakes or cocoa benefits. Happy baking!
FAQ about Spooky Black Velvet Cake
How can I make the cake more moist?
To achieve an even moister spooky black velvet cake, consider adding an extra ¼ cup of buttermilk or substituting some of the granulated sugar with brown sugar. Also, be sure to avoid overmixing the batter, which can lead to a denser texture. Integrating a tablespoon of sour cream into the mix can also work wonders for moisture!
What can I substitute for black cocoa powder?
If you can’t find black cocoa powder, you can substitute it with a mix of regular unsweetened cocoa powder and a touch of activated charcoal for color. Alternatively, using Dutch-processed cocoa powder will give you a similar flavor but may lighten the cake's dramatic hue. Make sure to use unsweetened cocoa to maintain the flavor balance.
Can this cake be made ahead of time?
Absolutely! The spooky black velvet cake layers can be baked in advance and stored at room temperature for up to two days. If you're looking to prepare even further ahead, wrap the layers tightly in plastic and freeze them for up to two months. The buttercream can also be made ahead and kept in the fridge for up to two weeks - just remember to whip it back to life before frosting!
For more tips on cake storage, check out this link.
Conclusion on Spooky Black Velvet Cake
Embracing homemade treats for every occasion
As the leaves turn and the air gets crisper, there’s no better way to celebrate than with a spooky black velvet cake. This enchanting dessert not only delights the taste buds but also brings a whimsical charm to any gathering. Crafting this cake at home allows you to pour love into each layer, making it a perfect choice for Halloween or any festive event. Enjoy baking!

Spooky Black Velvet Cake Recipe
Equipment
- stand mixer
- Cake pans
- Paddle attachment
- measuring cups
- Measuring Spoons
- sifter
- Parchment paper
Ingredients
Black Velvet Cake
- 2 cups all purpose flour 265g
- 1 ⅔ cups granulated sugar 340g
- ⅔ cup black cocoa powder 80g
- 2 teaspoon baking soda
- 1 teaspoon baking powder
- ½ teaspoon salt
- ½ cup vegetable oil 120ml
- 2 large eggs room temperature
- 1 ½ teaspoon pure vanilla extract
- 1 cup full-fat buttermilk room temperature DIY recipe in notes
- 1 cup hot coffee or hot water 240ml
Dye-Free Black Buttercream
- 2 cups unsalted butter room temperature 452g
- 5 cups powdered sugar 600g
- 1 cup black cocoa powder 112g
- 4 tablespoon whole milk room temperature
- 2 teaspoon pure vanilla extract
- ¼ teaspoon salt or to taste
Instructions
Make the Black Velvet Cake
- Preheat the oven to 350ºF and prepare three 6-inch or two 8-inch cake pans by spraying the sides with cooking spray and fitting the bottoms with a wax paper or parchment cake circle.
- Place all of the dry ingredients into the bowl of a stand mixer and stir on low for 30 seconds to fully combine them. Add the vegetable oil, eggs, vanilla, and buttermilk and mix on low until just combined. With the mixer still on low, add the hot water in a slow stream, then turn the mixer to medium and beat until smooth, about 2 minutes. The batter will be very thin.
- Pour into prepared cake pans no more than ⅔ full and bake for 32-36 minutes, until a toothpick inserted comes out clean. Cool completely before frosting.
Make the Black Buttercream
- In a stand mixer fitted with a paddle attachment, whip the butter on medium speed until creamy and light in color, about 4 minutes. Scrape down the bowl and paddle, then add half of the powdered sugar. Mix on low speed until just incorporated, then add the rest of the powdered sugar. With the mixer still in the off position, sift in the black cocoa powder and add the vanilla, milk, and salt. Mix on low until all ingredients are thoroughly combined, about 2 minutes, scraping down the bowl and paddle as needed.
- The buttercream will look dark brown at this point, but the color will darken significantly over the next several hours. See the recipe notes for storage instructions if you're not planning on frosting the cake the same day.
Assembly
- Once the cake layers have cooled completely, level them to your desired height. Fill and stack the layers with black buttercream, then crumb coat the cake with more black buttercream. Refrigerate the crumb coated cake for 20-30 minutes to let the frosting firm up.
- To create the design pictured, use the black buttercream to create a smooth finish on the cake, then refrigerate it for at least 30 minutes. Use the rest of the black buttercream to create lambeth piping. Accent the lambeth piping with round black sprinkles where desired.

Leave a Reply