
Introduction to Burnt Honey Pie
Why Burnt Honey Pie is a Game Changer for Homemade Desserts
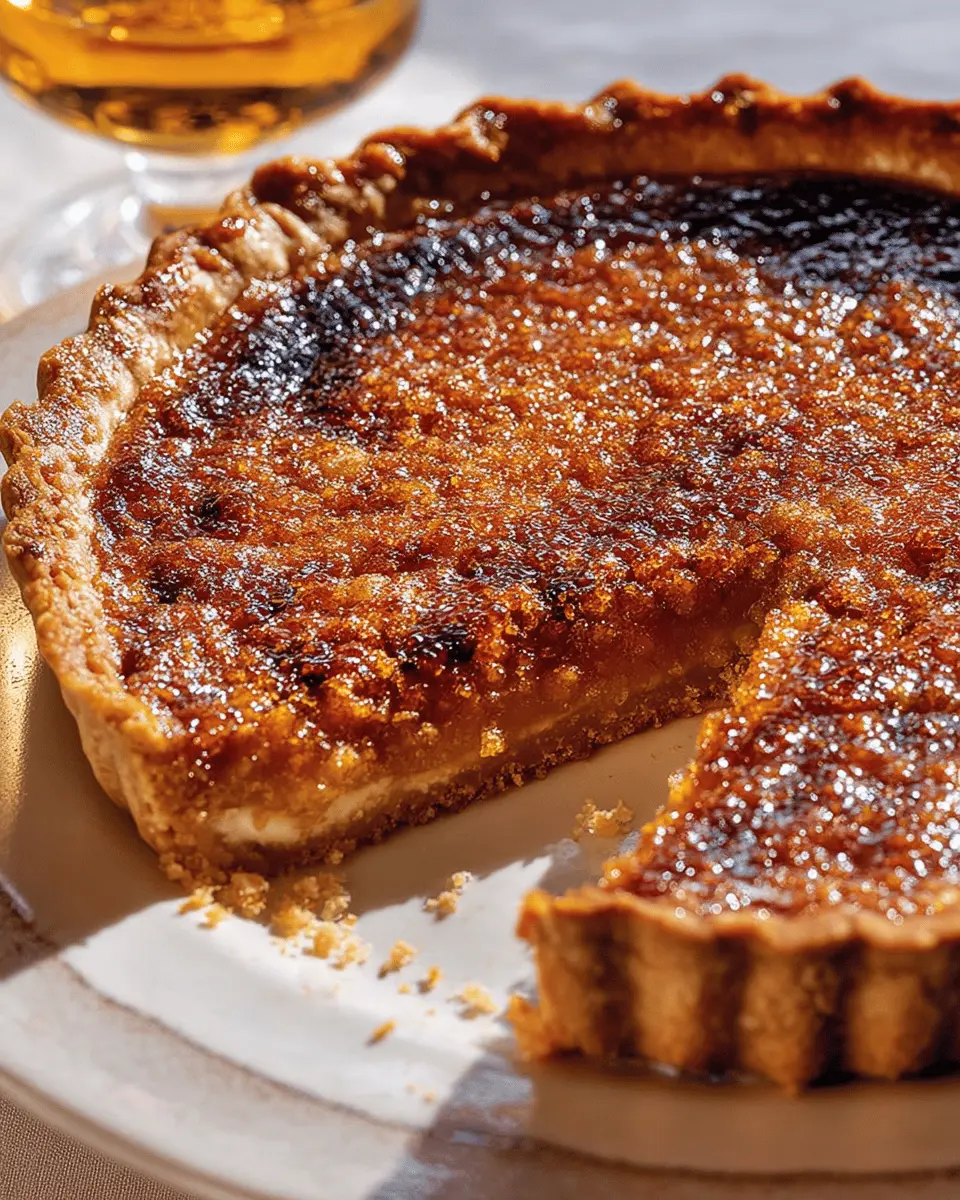
If you're tired of the same old desserts and ready to switch things up, burnt honey pie is here to save the day! Imagine a pie that combines the warmth of caramelized honey with a delightful crunch from a buttery oat crust. The deep flavors achieved by slowly cooking honey until it reaches a rich, smoky hue make this dessert not only unique but utterly irresistible.
So, why should you give burnt honey pie a whirl? For starters, its bold and complex flavor profile is unlike anything you’ve likely ever tasted in a traditional dessert. The subtle sweetness of honey, enhanced by the browning process, elevates your typical pie experience into something truly extraordinary. Plus, it’s surprisingly simple to make!
Whether you’re hosting a gathering or simply treating yourself after a long week, this pie is bound to impress. It's an elegant showstopper that feels both comforting and sophisticated. If you’re intrigued and want to learn more about how to create this masterpiece, be sure to check out resources like Serious Eats for additional tips on working with honey in desserts.
Now, let’s delve into the delicious details of this show-stopping recipe!
Ingredients for Burnt Honey Pie
When it comes to creating the perfect burnt honey pie, having the right ingredients is essential. Let’s break it down into two key components: the crust and the filling.
Essential ingredients for the crust
To build a delicious base for your pie, you'll need:
- ½ cup unsalted butter: This is crucial for that rich flavor.
- 1 cup rolled oats: They add a lovely texture.
- ½ cup all-purpose flour: Perfect for structure.
- ¼ cup packed light brown sugar: For a hint of sweetness.
- ½ teaspoon fine sea salt: Enhances all the flavors.
This combination not only guarantees a tantalizing crust but is also easy to work with.
Must-have ingredients for the filling
Now, moving on to the filling—this is where the magic really happens! Gather these key ingredients:
- ¾ cup amber honey: Opt for high-quality honey, like wildflower or clover, for rich flavor.
- ¼ cup unsalted butter, cubed: Adds creaminess.
- ½ cup sour cream or crème fraîche: For a smooth, tangy contrast.
- 1 teaspoon pure vanilla extract: Essential for depth.
- 3 egg yolks: They help bind your filling.
- Icing sugar for dusting: A simple touch before serving.
Each ingredient in your burnt honey pie plays a vital role in achieving that perfect balance of sweetness and texture. Curious about some tips for sourcing your honey? Check out Savvy Honey Buyers for recommendations!
Step-by-Step Preparation of Burnt Honey Pie
Creating a burnt honey pie at home is an exciting culinary adventure! Let’s take it step by step to ensure you end up with a stunning dessert that will impress your friends and family.
Prepare the crust ingredients
Start by gathering your crust ingredients:
- ½ cup (125 mL) unsalted butter
- 1 cup (250 mL) rolled oats
- ½ cup (125 mL) all-purpose flour
- ¼ cup (60 mL) packed light brown sugar
- ½ teaspoon (2 mL) fine sea salt
Having everything ready will simplify the process. A quick tip: using room-temperature butter helps it blend easier!
Make the burnt butter for the crust
Next, it’s time to create that delicious burnt butter flavor. Melt the unsalted butter in a small saucepan over medium heat. Stir continuously until the butter is foamy and flecked with brown milk solids, about 4 to 6 minutes. The aroma is incredible! Once done, pour the butter into a heatproof bowl, let it cool slightly, and then refrigerate until solid (about 45 minutes to 1 hour).
Combine and press the crust mixture
While the butter is chilling, combine the oats, flour, brown sugar, and salt in a mixing bowl. Once the butter is cooled, mix it into the dry ingredients using your fingers or a pastry cutter until it holds together when pressed. If it seems too crumbly, add 1 to 2 teaspoons of water. Transfer this mixture to a 9-inch pie plate and press it evenly across the bottom and up the sides—just don’t cover the rim!
Chill the crust before baking
Refrigerate the crust for about 20 minutes. This helps to firm it up and will result in a better texture after baking.
Bake the crust to golden perfection
Preheat your oven to 350°F (177°C) and bake the chilled crust on the center rack for about 15 to 18 minutes, or until it is lightly golden. If it slumps during baking, gently re-form it with a metal measuring cup and bake for 2 to 3 minutes more.
Create the burnt honey filling
While the crust is baking, it’s time to focus on the star of the show—the filling. In a medium pot, bring ¾ cup (175 mL) of amber honey to a boil over medium heat. Watch for that deep reddish-brown color and fragrant smell; it should take about 6 to 8 minutes. Once it reaches this point, carefully whisk in ¼ cup (60 mL) of cubed unsalted butter, followed by ½ cup (125 mL) of sour cream or crème fraîche, 1 teaspoon (5 mL) of pure vanilla extract, and ½ teaspoon (2 mL) of fine sea salt.
Whisk in the egg yolks and cornstarch
In a small bowl, whisk together 3 egg yolks and 1 teaspoon (5 mL) of cornstarch. Slowly incorporate ½ cup (125 mL) of the honey mixture into the yolk mixture. Pour everything back into the honey mixture and whisk until combined.
Pour the filling into the crust
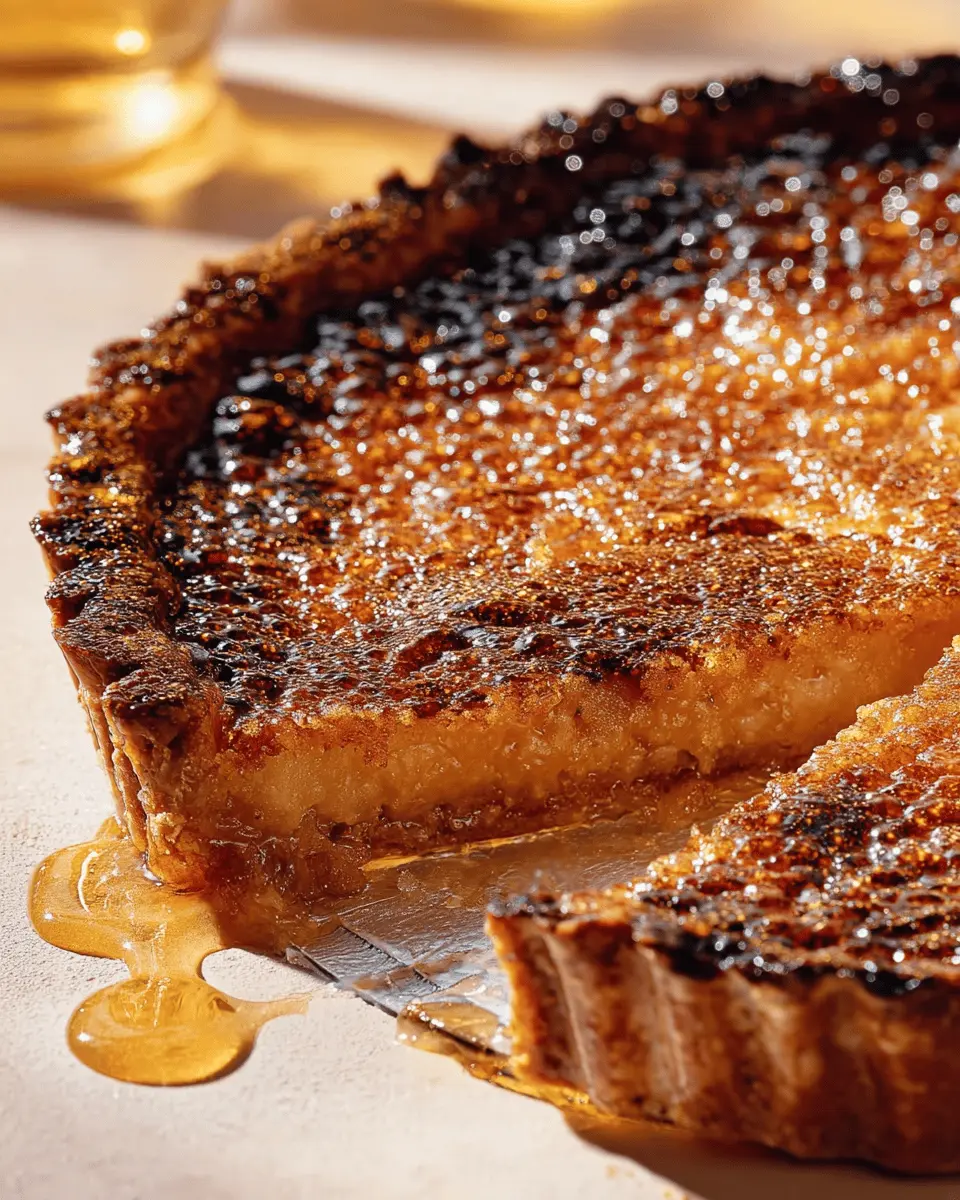
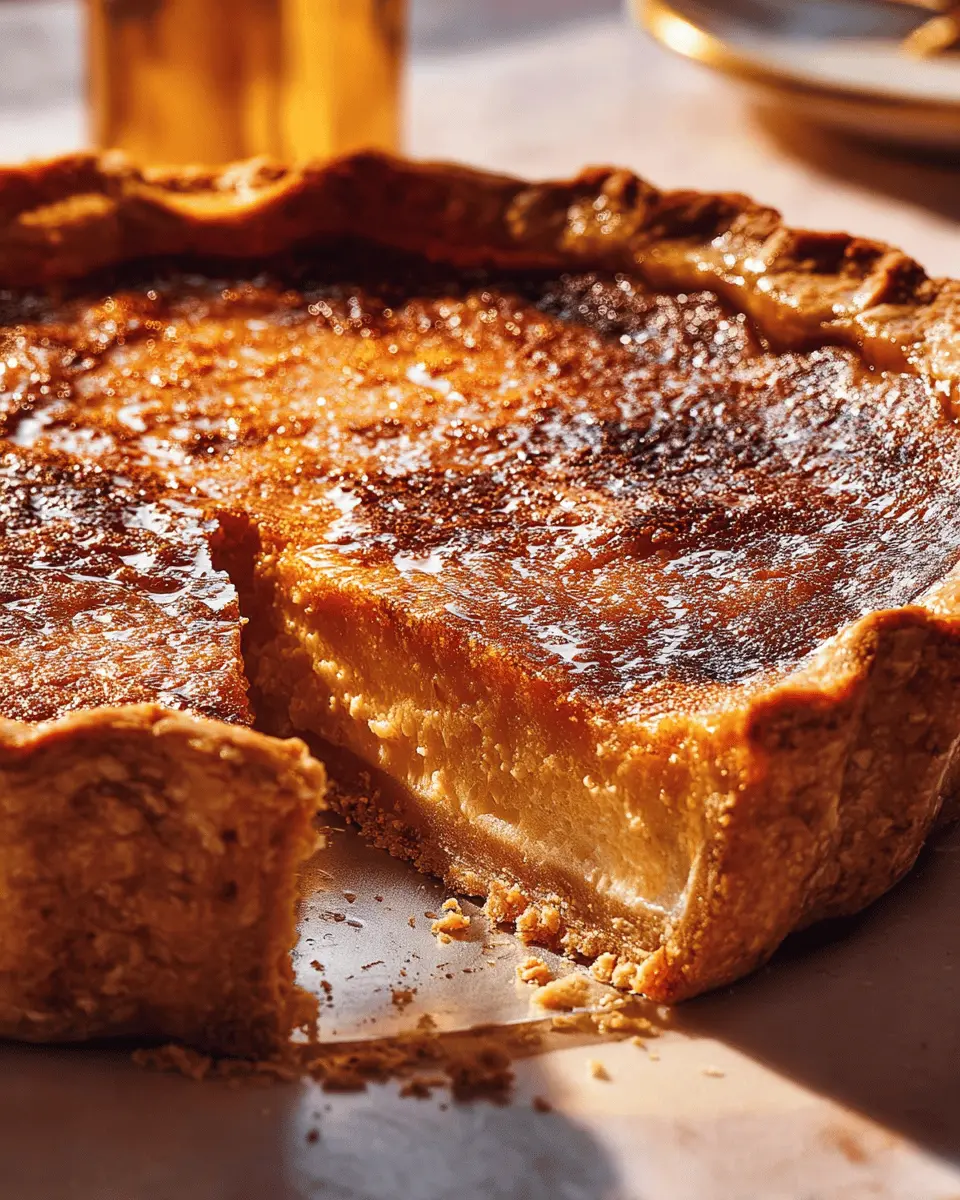
Carefully pour this luscious filling into the pre-baked crust. Use a spoon to splash some of the mixture over the sides of the crust, which will caramelize nicely during baking.
Bake and cool the pie
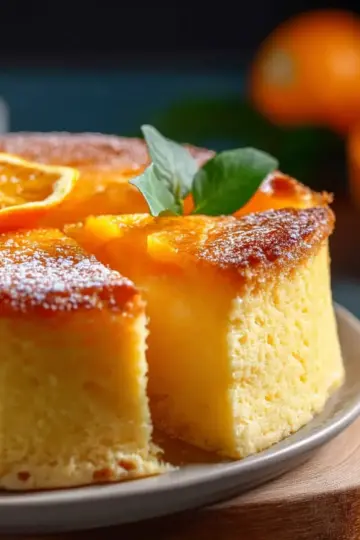
Bake the pie until the edges of the filling are set but the center jiggles slightly—around 14 to 16 minutes should do. Once baked, transfer the pie to a wire rack and let it cool completely for 2 to 3 hours. Just before serving, dust with icing sugar. This burnt honey pie is not only a visual treat but also a delightful culmination of flavors that promises to be a hit!
For more tips on making the perfect pie or other unique desserts, you can explore Bon Appétit or Serious Eats for inspiration. Enjoy your baking journey!
Variations on Burnt Honey Pie
Seasonal Spices to Amp Up the Flavor
Want to elevate your burnt honey pie experience? Consider adding seasonal spices like cinnamon or nutmeg to the filling. These spices not only bring warmth but also pair beautifully with the deep flavor of burnt honey. A pinch of cardamom can also add an intriguing twist, making it perfect for cozy fall evenings. Sprinkle some fresh ginger for a zesty kick, or infused chai spices for a unique flavor profile that dazzles.
Alternative Fillings for Adventurous Bakers
Feeling adventurous? Substitute the traditional filling with creative alternatives! For a fruity delight, try incorporating roasted figs or pears into the mix. If you fancy a richer flavor, consider adding dark chocolate or a swirl of caramel. Dairy-free? Use coconut cream in place of sour cream for a tropical flair, while maintaining that delightful creaminess. These variations will keep your burnt honey pie fresh and exciting every time you bake!
For more inspiration, check out Serious Eats for unique pie recipes.
Cooking Tips and Notes for Burnt Honey Pie
Troubleshooting Common Pie Crust Issues
When crafting your burnt honey pie, a beautiful crust is key. Here are some common issues and fixes to keep in mind:
- Crust Slumping: If your crust begins to slump during baking, simply use a metal measuring cup to gently reshape it and pop it back in the oven for an additional 2 to 3 minutes.
- Crust Not Setting: If your crust crumbles when pressed, it may need moisture. Adding a teaspoon of water can help bind it together.
Best Practices for Achieving the Perfect Burnt Honey
Getting that delectable burnt flavor in your burnt honey pie is all about control:
- Mind the Heat: Gradually bring the honey to a boil, stirring occasionally. Staying vigilant helps unlock the rich flavors without burning it too early.
- Monitor Temperature: If you're using an instant-read thermometer, aim for 340°F (171°C) to ensure you achieve that desired aromatic sweetness.
With these tips, your pie will shine in texture and flavor, making it a delightful centerpiece for any gathering! For more baking inspiration, check out the Food Network or King Arthur Baking Company for additional recipes and resources.
Serving Suggestions for Burnt Honey Pie
Pairing Options for the Ultimate Dessert Experience
To elevate your burnt honey pie experience, consider pairing it with a scoop of rich vanilla ice cream or a dollop of freshly whipped cream. The creamy texture beautifully balances the pie's caramelized flavor. If you’re feeling adventurous, serve it alongside spiced nuts or a seasonal fruit salad to introduce a delightful crunch or freshness.
For a warm, cozy touch, a cup of herbal tea or coffee can wonderfully complement the rich notes of honey. Feel free to explore additional pairing ideas that suit your palate!
How to Present Your Burnt Honey Pie Beautifully
Presentation is key! To make your burnt honey pie shine, consider using a glass pie dish to showcase its golden crust. After dusting it with icing sugar, place it on a decorative cake stand for a sophisticated touch. Garnish with a sprig of mint or edible flowers for a pop of color and an elegant finish.
Don’t forget to slice it neatly to reveal the beautiful layers inside! Show off the texture and color contrasts, inviting your guests to savor a piece. For more serving tips, check out this guide on dessert presentation. Your guests will be impressed before they even take their first bite!
Time Breakdown for Burnt Honey Pie
When preparing this delicious burnt honey pie, it’s great to have an idea of how your time will be spent. Here’s a straightforward breakdown to help you plan your baking adventure.
Preparation Time
Expect to spend about 15 minutes preparing your ingredients and assembling the crust and filling.
Baking Time
The actual baking time is approximately 30 minutes—15 to 18 minutes for the crust and 14 to 16 minutes for the filling.
Cooling Time
Once it’s out of the oven, allow the pie to cool for 2 to 3 hours. This waiting period is essential for achieving that perfect texture.
Total Time
In total, you’ll need about 3 to 4 hours, considering all stages of preparation, baking, and cooling.
This time breakdown allows you to enjoy the process and ensures your burnt honey pie turns out perfectly every time! Happy baking, and for more tips on pie-making, check out this baking guide for great insights.
Nutritional Facts for Burnt Honey Pie
When indulging in a delightful slice of burnt honey pie, it's good to know what you're enjoying! Here’s a quick glance at the nutritional content:
Calories per serving
Each serving contains approximately 300 calories, making it a satisfying dessert that won't break the calorie bank.
Protein content
You’ll get about 4 grams of protein per slice, mainly from the eggs and dairy, which helps keep you feeling full.
Key nutrients
This pie boasts essential nutrients like calcium from the sour cream and healthy fats from the butter, promoting a balanced treat.
For a deeper dive into maintaining your nutrition while enjoying delicious desserts, explore resources like the USDA Nutrition Database to enhance your knowledge. Don't forget to consider how sweet treats fit into your overall dietary goals!
FAQs about Burnt Honey Pie
What does "burnt" mean in burnt honey pie?
In the context of burnt honey pie, "burnt" refers to the caramelization process that transforms amber honey into a deeper, more complex flavor. When the honey is heated until it reaches a reddish-brown hue, it develops a rich, toasty aroma and a robust taste that gives the pie its unique character. It’s not just about achieving a charred look; it’s about enhancing the natural flavors.
For more on caramelization and its impact on flavor, check out this culinary guide.
Can I make this pie ahead of time?
Absolutely! Burnt honey pie can be made a day in advance. Just store it covered at room temperature for up to three days. This allows the flavors to meld beautifully, making each slice even more delightful.
What are some good substitutes for ingredients in the recipe?
If you don’t have certain ingredients on hand, here are a few substitutes:
- Honey: You can use maple syrup for a different flavor profile.
- Sour cream: Greek yogurt works well as an equivalent.
- Crème fraîche: Full-fat yogurt can also do the trick.
- Oats: Quick oats can replace rolled oats, but texture may vary.
Experimenting with substitutes not only emphasizes your creativity in the kitchen but can also tailor the burnt honey pie to your specific taste preferences!
Conclusion on Burnt Honey Pie
Final thoughts and encouragement to try your own burnt honey pie
Creating a burnt honey pie at home isn’t just baking; it’s a delightful experience that fills your kitchen with warm, inviting aromas. I encourage you to embrace the unique flavors and textures of this pie. Don’t hesitate to add your own twists—perhaps a sprinkle of sea salt or a touch of citrus zest could elevate it further! Happy baking!

Burnt Honey Pie
Equipment
- small saucepan
- Mixing Bowl
- measuring cup
- Whisk
- pie plate
- wire rack
Ingredients
Crust
- 0.5 cup unsalted butter melted
- 1 cup rolled oats
- 0.5 cup all-purpose flour
- 0.25 cup packed light brown sugar
- 0.5 teaspoon fine sea salt
Filling
- 0.75 cup amber honey such as wildflower or clover
- 0.25 cup unsalted butter cubed
- 0.5 cup sour cream or crème fraîche
- 1 teaspoon pure vanilla extract
- 0.5 teaspoon fine sea salt
- 1 teaspoon cornstarch
- 3 large egg yolks
- Icing sugar for dusting
Instructions
Crust Preparation
- Melt butter in a small saucepan over medium heat. Cook until foamy and flecked with brown milk solids, 4 to 6 minutes.
- Pour into a small heatproof bowl. Cool slightly then refrigerate until solid, 45 minutes to 1 hour.
- Combine oats, flour, sugar and salt in a mixing bowl. Mix cooled butter into oat mixture until combined.
- Transfer to a 9-inch pie plate and press mixture evenly across the bottom and up the sides, refrigerating until firm, about 20 minutes.
- Preheat oven to 350°F (177°C). Bake crust until lightly golden, about 15 to 18 minutes.
Filling Preparation
- Bring honey to a boil in a medium-size pot over medium heat. Cook until honey is deep reddish-brown, 6 to 8 minutes.
- Remove from heat and whisk in butter, sour cream, vanilla and salt.
- Whisk cornstarch with yolks in a small bowl, then gradually whisk in ½ cup honey mixture.
- Scrape yolk mixture into honey mixture and whisk until uniform.
- Pour mixture into prepared crust, splash some over edges to saturate, and bake until edges are set but centre jiggles slightly, 14 to 16 minutes.
- Cool completely on a wire rack for 2 to 3 hours and dust with icing sugar before serving.

Leave a Reply