
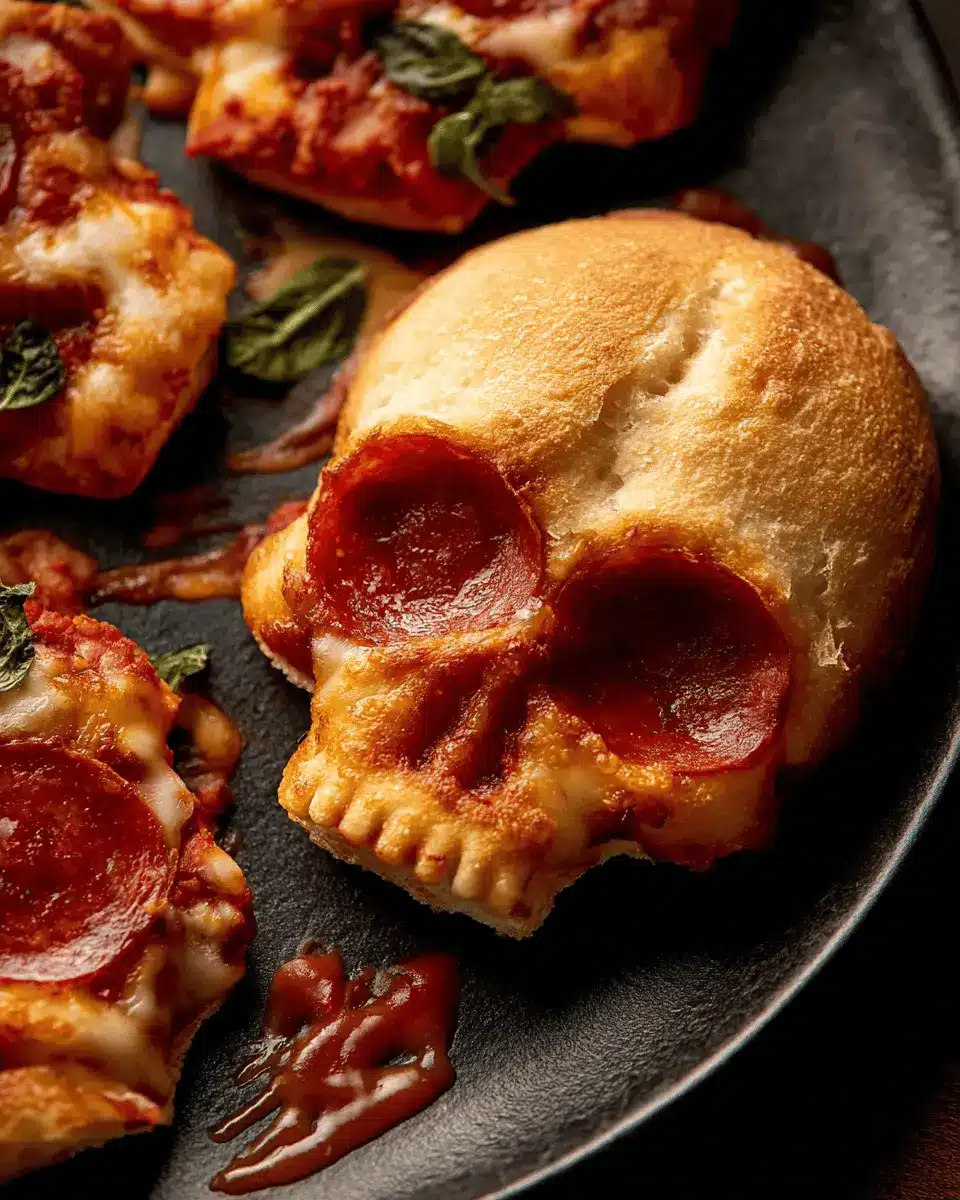
Introduction to Halloween Pizza Skulls
Are you ready to add a spooky twist to your next gathering? Halloween Pizza Skulls are the perfect treat that blends festive fun with everyone’s favorite comfort food—pizza! Whether you’re hosting a Halloween bash, a casual get-together, or just looking to impress the kids, these adorable, savory skull-shaped delights will surely be a hit.
Why Halloween Pizza Skulls are the Perfect Treat
What sets Halloween Pizza Skulls apart? For starters, they let you unleash your creativity. From ooey-gooey mozzarella to a variety of toppings like turkey bacon, chicken ham, or even mini pepperoni, you can customize each skull to suit your taste buds—or those of your guests. Plus, as you shape the dough into these eerie morsels, you're not just cooking; you're creating a fun and interactive experience for everyone involved.
These pizza skulls also make for an easy-to-eat option. No plates or utensils are required—just grab and go! You can serve them alongside marinara sauce for dipping, adding an extra layer of flavor. To complement your dish, pair it with a refreshing beverage, such as a sparkling apple cider or a Halloween-themed mocktail for an extra festive vibe.
Ready to conjure up some delicious Halloween Pizza Skulls? Let's dive into the recipe!
Ingredients for Halloween Pizza Skulls
When whipping up these fun and spooky Halloween Pizza Skulls, it's essential to have all the right ingredients lined up. Here’s your shopping list to ensure a tasty treat that will wow your guests at this year's Halloween party!
Essential Ingredients
-
13 to 16 ounces of pre-made pizza dough
(Opt for boxed rolled out dough or fresh dough usually sold in bags.) -
¾ to 1 cup pizza sauce
(This will add that delicious, classic flavor.) -
2 cups shredded mozzarella
(A gooey, melty cheese is key!) -
¼ cup grated Parmesan cheese
(Sprinkle some magic on top!)
Choose Your Favorite Toppings
Get creative with your toppings. Consider these options for filling:
- Cooked sausage: about 8 ounces for six skulls
- Mini pepperoni: about 6 ounces for six skulls
- Black olives: sliced
- Sliced chicken ham: chopped
- Crumble turkey bacon: for a crispy twist
- Mini Italian meatballs
- Cooked corn kernels
- Baby spinach and fresh basil for a touch of greenery
To Serve
- Marinara sauce: perfect for dipping
- Chopped parsley or basil for garnish
With these ingredients, you'll be well on your way to creating delightful and creepy Halloween Pizza Skulls. Don't forget to visit Serious Eats for more tips on pizza perfection!
Step-by-step Preparation of Halloween Pizza Skulls
When it comes to making your very own Halloween Pizza Skulls, the process can be both straightforward and enjoyable. Let’s dive into the step-by-step preparation to help you create these creepy culinary delights.
Prepare Your Workstation
First things first—clear a space on your countertop and gather all your ingredients. This includes your pre-made pizza dough, pizza sauce, shredded mozzarella, and any favorite toppings like turkey bacon, chicken ham, or mini pepperoni. Spraying your mini skull baking tin with cooking spray will ensure the pizzas come out easily after baking. Don’t forget to have a rolling pin handy, too! A well-prepared workstation boosts both efficiency and creativity.
Roll Out the Pizza Dough
Lightly dust the counter with flour to keep your dough from sticking. Grab your pizza dough—if it’s in a ball, let it rest for a few minutes to become pliable. Roll, pat, or stretch the dough until it’s approximately ¼″ thick. Without worrying too much about perfection, cut the dough into six rectangles. They don’t need to be exactly the same size or shape; the more rustic, the better!
Fill the Skull Cavities
Now’s the fun part! Take one piece of dough and gently press it into the skull cavity of your baking tin. Start with a generous spoonful of pizza sauce, layering with shredded mozzarella and your choice of toppings—whether that’s turkey bacon, sliced olives, or fresh baby spinach. Finish it off with a sprinkle of Parmesan and another dollop of sauce. Remember, moderation is key here; overfilling could result in a messy bake.
Seal and Refrigerate
Once all six pieces are filled with delicious goodness, fold the dough over the fillings, pinching the edges together like you’re making miniature pizza pockets. This sealing step is crucial to avoid any spills during baking. After sealing each skull, place the tray in the refrigerator. This helps set the dough before you pop it in the oven, allowing the flavors to mingle beautifully.
Bake the Pizza Skulls
Preheat your oven to 400 degrees Fahrenheit. After a brief chill session, remove the tray from the refrigerator and bake your Halloween Pizza Skulls for 16 to 20 minutes. Keep an eye on them—some pre-made doughs may require a bit more time to reach that perfect golden brown color. Once done, let them cool slightly for about 5 minutes, then carefully unmold them. For a ghoulish twist, serve alongside a warm marinara sauce for dipping, and perhaps some chopped parsley for a touch of color.
Getting creative with Halloween Pizza Skulls not only sets a festive mood but can also be a fun cooking experience with friends or family. Have you tried your own spin on these pizza wonders? Be sure to share your creations!
Variations on Halloween Pizza Skulls
Halloween isn't just about costumes and candy; it's also the perfect opportunity to get creative in the kitchen! Why not put a spooky spin on your favorite dish with Halloween Pizza Skulls? Here are a couple of fun ways to switch things up.
Fun Toppings to Try
While classic toppings like sausage and pepperoni are always a hit, think outside the box! You could add:
- Mini Italian meatballs for a hearty bite
- Chopped chicken ham to keep it lean
- Sliced black olives for an eerie finish
- Fresh spinach for a dash of color
Experiment with these toppings to create a unique flavor profile for your skulls! Feeling adventurous? Try combining sweet and savory flavors, such as adding a touch of honey.
Different Cheese Options
Mozzarella is a fantastic go-to, but don’t hesitate to explore other cheese options for your Halloween Pizza Skulls.
- Cheddar cheese can add a sharp bite.
- Try pepper jack cheese for a little heat.
- Goat cheese introduces a creamy tang that pairs well with many toppings.
Mix and match to find your perfect cheesy combination! The variety can elevate your Halloween soirée and keep your guests guessing.
Cooking Tips and Notes for Halloween Pizza Skulls
Avoiding Overfilling
To ensure your Halloween Pizza Skulls look and taste amazing, be mindful of the filling amounts. Overfilling can lead to messy spills and uneven cooking. Aim for about a tablespoon of sauce and a light sprinkle of toppings in each skull cavity. If you’re unsure, less is more—remember, you can always add a bit more filling next time!
Ensuring Even Baking
For perfectly baked Halloween Pizza Skulls, it's essential to preheat your oven properly and watch the baking time closely. Since different doughs may vary, start checking at around 16 minutes. If they aren’t golden brown yet, give them a few extra minutes. This adjustment ensures they cook evenly on both the inside and outside, leading to a delightful treat that’s crispy and satisfying.
Serving Suggestions for Halloween Pizza Skulls
Perfect Dipping Sauces
Serve your Halloween Pizza Skulls with an array of tasty dipping sauces to elevate the experience! Marinara is a classic choice, but consider mixing it up with garlic aioli or a spicy arrabbiata sauce for a kick. For something creamy, ranch dressing pairs wonderfully with the pizza flavors and encourages dipping fun. You could also create a festive green sauce using blended avocado and lime for a spooky twist!
Creative Presentation Ideas
Make your Halloween Pizza Skulls the star of the show with playful presentations! Arrange them on a large platter styled like a ghostly board. Add some fresh herbs like parsley or basil for a pop of color and a touch of creepiness. For a dramatic touch, you can scatter some plastic spiders or use a themed tablecloth. For more ideas on creative serving, check out this entertaining guide!
These tips will help your Halloween gathering be both delicious and fun!
Time Breakdown for Making Halloween Pizza Skulls
Preparation Time
Get ready to dive into some spooky fun! Prep time for your Halloween Pizza Skulls will take about 15-20 minutes. During this time, you’ll have a chance to roll out your pizza dough and get those filling ingredients ready.
Baking Time
Once you’ve shaped your skulls, it’s time for the magic to happen in the oven! Bake your delicious creations for 16 to 20 minutes, keeping an eye out for that lovely golden brown color.
Total Time
In total, from start to delicious finish, you’re looking at roughly 45-50 minutes. Perfect for a festive gathering or a fun night in! Looking for a few more tips on the best toppings? Check out this site for creative inspiration.
Ready to create some spooky, savory goodness? Let's get cooking!
Nutritional Facts for Halloween Pizza Skulls
When indulging in Halloween Pizza Skulls, it's helpful to know what you’re biting into. Here’s a quick snapshot of the nutritional facts:
Calories
Each serving of these delightful pizza skulls contains approximately 250 to 300 calories, depending on your choice of toppings and portion sizes.
Protein
With a rich blend of toppings like mozzarella and turkey bacon, these treats pack about 12 to 15 grams of protein per serving—perfect for keeping you full during Halloween festivities!
Sodium
Be mindful of sodium intake, as one serving can contain around 600 to 800 milligrams. Opt for low-sodium pizza sauce and limit processed meats to keep your heart happy while enjoying these spooky delights.
Want more insights on Halloween-themed meals? Check out sources like the American Heart Association to learn about nutrition that suits your lifestyle.
FAQ About Halloween Pizza Skulls
Can I freeze Halloween Pizza Skulls?
Absolutely! Freezing Halloween Pizza Skulls is a great way to enjoy them later. After baking, let them cool completely, then wrap each skull tightly in plastic wrap and place them in an airtight container. They can last up to three months in the freezer. When you're ready to eat, simply reheat them in the oven at 350°F (175°C) until warmed through.
What other fillings can I use?
The beauty of Halloween Pizza Skulls is their versatility! Feel free to experiment with different fillings. Consider using:
- Vegetables: Bell peppers, mushrooms, or zucchini
- Meats: Ground turkey, or grilled chicken in place of sausage and chicken ham
- Cheeses: Cheddar, feta, or a blend for an extra cheesy experience
You can find more inspiration for fillings at EatingWell, where they share tons of creative recipes.
How can I make them healthier?
For a healthier twist on Halloween Pizza Skulls, try these tips:
- Use whole grain or gluten-free pizza dough
- Add more veggies for fiber and nutrients
- Substitute heavier meats with lean proteins like turkey bacon or chicken ham
- Consider using low-fat cheese options
These simple swaps can make your snack festively spooky while keeping health in mind!
Conclusion on Halloween Pizza Skulls
Halloween Pizza Skulls are the perfect spooky treat to elevate your festive gatherings. Not only are they fun to make, but they also offer endless customization options with your favorite toppings. Serve them warm with marinara sauce for dipping, and watch your guests enjoy these eerie delights!
Halloween Pizza Skulls: Indulge in Spooky Homemade Fun
Equipment
- Mini skull baking tin
Ingredients
Dough and Sauce
- 13 to 16 ounces pre-made pizza dough boxed rolled out dough or fresh pizza dough
- ¾ to 1 cup pizza sauce
- 2 cups shredded mozzarella
- ¼ cup Parmesan cheese
Favorite Toppings
- 8 ounces cooked sausage for 6 pizza skulls
- 6 ounces mini pepperoni for 6 pizza skulls
- black olives sliced
- sliced ham chopped
- crumbled crispy bacon
- mini Italian meatballs
- cooked corn kernels
- baby spinach
- fresh basil
To Serve
- marinara sauce for dipping
- chopped parsley or basil
Instructions
Preparation
- Spray the mini skull baking tin with cooking spray.
- Dust the counter lightly with flour to prevent the dough from sticking. Roll, pat, or stretch the dough out until it is roughly ¼" thick. Cut the dough into 6 rectangles. Don’t worry if they aren’t perfectly shaped or exactly equal in size.
- Working with one piece of dough at a time, lay each dough piece into the skull cavity and start filling it with sauce, mozzarella, a sprinkle of Parmesan cheese and your desired toppings. After adding the toppings, add a little bit of pizza sauce on top before sealing the dough (no more than a tablespoon).
- Fold the dough over the fillings, pinching the dough together to seal them (like a small pizza pocket). Continue until the 6 pieces have been filled and sealed.
- Refrigerate the skull pizza tray while you preheat the oven.
- Preheat the oven to 400 degrees Fahrenheit.
- Remove the tray from the refrigerator and bake for 16 to 20 minutes or until lightly golden brown (some pre-made doughs may need more or less time).
- Remove from the oven and allow it to cool for 5 minutes. Unmold and serve with marinara sauce and chopped parsley or basil (optional).


Leave a Reply