
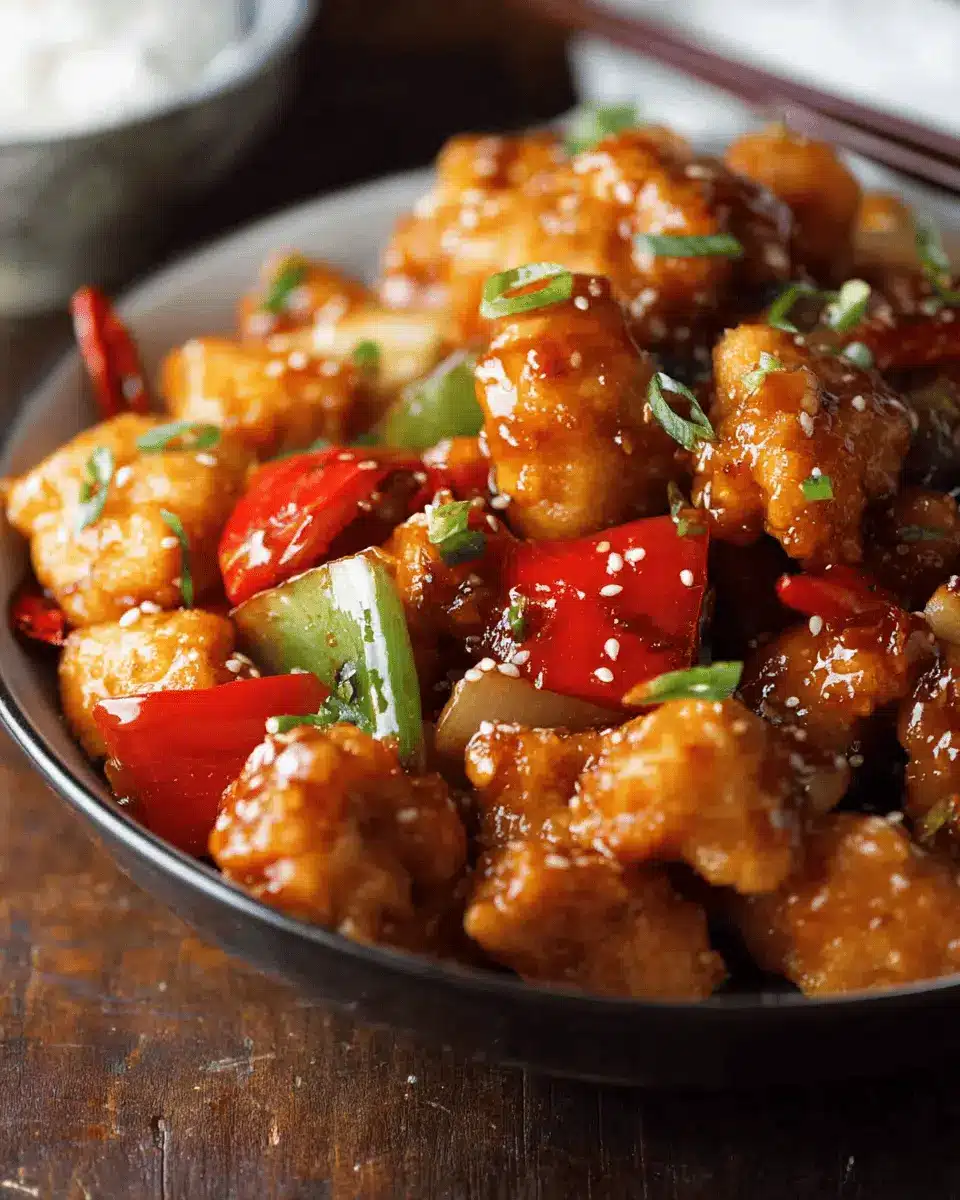
Introduction to Baked Sweet and Sour Chicken
If you’re looking to whip up a delightful meal that balances sweet and tangy flavors, baked sweet and sour chicken is a fabulous choice. This dish is not only visually appealing, with its vibrant colors, but it also offers a taste that appeals to all ages. Whether you're hosting friends or prepping for a busy workweek, this dish is sure to impress.
Why Choose Baked Over Fried?
When it comes to cooking methods, many of us often think of frying as the quickest route to deliciousness. However, opting for baked chicken can be a game changer. Baking not only reduces the amount of oil needed, making it a healthier option, but it also infuses the chicken with a lovely, rich flavor without the greasy aftermath. Plus, the baking process allows for a juicier result, perfectly complimented by the sticky sweet and sour sauce.
Choosing baked over fried also means you can enjoy a lighter meal with all the satisfying crunch and bold flavors you crave. If you’re keen on exploring nutritious alternatives, consider pairing this dish with cauliflower rice for a low carb option or serve it with regular rice for a heartier side.
So, grab your apron and get ready to enjoy a comforting plate of savory goodness—let's dive into the recipe!
Ingredients for Baked Sweet and Sour Chicken
When it comes to baked sweet and sour chicken, the right ingredients are key to achieving that perfect balance of flavors. Let’s break down the essential components you'll need for this delicious dish.
Essential chicken and vegetable ingredients
- Chicken Breast: 1 lb (500 g) of chicken breast, cut into bite-size cubes, creates a protein-packed base.
- Vegetables: A hearty mix includes 1 small onion, ½ red bell pepper, and ½ green bell pepper—each diced to maximize flavors and textures.
- Pineapple: One 8 oz (250 g) can of pineapple pieces, in natural juice, adds sweetness to the mix.
These ingredients not only provide flavor but also contribute to the dish's vibrant colors, making it as pleasing to the eyes as it is to the palate.
Key sauce components
A great sauce is the heart of any baked sweet and sour chicken recipe. The key components are:
- Sugar: ½ cup of either white or brown sugar sweetens the dish beautifully.
- Vinegar: ⅓ cup of apple cider vinegar provides a tangy kick, balancing the sweetness.
- Pineapple Juice: 2-3 tablespoons adds a tropical twist.
- Ketchup, Worcestershire sauce, and soy sauce bring depth and complexity to the flavor profile.
With these ingredients on hand, you’re well on your way to creating a mouth-watering dish that’s sure to impress your friends and family. For tips on cooking rice to pair, check out our rice cooking guide.
Step-by-step preparation for Baked Sweet and Sour Chicken
Preparing baked sweet and sour chicken from scratch can seem daunting, but breaking it down into manageable steps makes it a breeze. Here’s how to master this delightful dish, step by delicious step.
Prepping the chicken
Start with 1 pound of chicken breast, ensuring it’s cut into bite-sized cubes. This size will not only cook evenly but also make each piece easy to eat. In a bowl, season the chicken with half a teaspoon of salt. Next, beat 1 large egg (or 2 small ones) and pour it over the chicken. Use your hands (a great excuse to get a little messy!) to mix everything together, ensuring all the pieces are coated. Let the excess egg drip off before moving to the next step.
Coating with cornstarch
Grab a large ziplock bag and pour in 1 cup of cornstarch (also known as cornflour). Working in small batches, place the chicken in the bag, seal it, and shake gently. This will coat the chicken evenly with cornstarch, giving it that lovely crispy texture once baked. Remember to discard any excess cornstarch left in the bag; we want just the right amount sticking to the chicken.
Baking the chicken
Preheat your oven to 200°C (390°F). In a large skillet, heat oil over high heat—about 3 to 5 tablespoons should do. Carefully add the coated chicken in batches, cooking just for 2 minutes until the outside is golden brown. Don’t worry if the chicken is still raw inside; it will finish cooking in the oven. Transfer it to a baking tray, spray a light coat of oil on top, and let it bake for 15 to 20 minutes. This step is crucial for achieving that crispy yet tender finish.
Cooking the sauce
While the chicken is baking, it’s time to shift your focus to the sauce. Discard the oil from the skillet, wiping it down gently. Heat half a tablespoon of oil over medium-high heat, then toss in a minced garlic clove and sauté for about 20 seconds until fragrant. Add a diced small onion, cooking for 2 minutes before introducing half of a red and green bell pepper, each cut into bite-sized pieces. Enjoy the vibrant colors and aromas as they come together!
Incorporate the sauce ingredients: ½ cup sugar, ⅓ cup apple cider vinegar, pineapple juice, 3 tablespoons ketchup, and a dash of Worcestershire, soy, and oyster sauces. Stir until the sugar dissolves, and let it bubble gloriously.
Combining chicken and sauce
Once the sauce reaches a syrupy consistency, add the warm pineapple pieces and remove from the heat. When your chicken has finished baking, gently toss it in the sauce in the skillet. You want every piece to be generously coated because, after all, that’s what makes this dish * irresistible*. Serve it hot, perhaps over rice or cauliflower rice for a healthy twist.
By following these steps, your baked sweet and sour chicken will be both simple to make and utterly delicious, leaving your friends and family asking for seconds! Check out more about the benefits of incorporating poultry in your diet at sites like the American Heart Association for extra inspiration.

Variations on Baked Sweet and Sour Chicken
Tropical Twist with Mango
Elevate your baked sweet and sour chicken by adding a tropical twist! Simply mix in fresh mango chunks with the pineapple before cooking. The sweetness of the mango complements the tanginess of the sauce beautifully, bringing a lush, summery flavor to your dish. Pairing these fruits adds vibrant colors and delightful textures that will impress your guests. For a more dynamic dish, consider serving it over coconut rice for an exotic flair. Want to learn more about tropical fruit combinations? Check out this resource on flavor pairings.
Vegetarian Version with Tofu
For a delicious vegetarian alternative, swap the chicken for firm tofu. Start by pressing the tofu to remove excess moisture, then cut it into cubes and marinate in a bit of the sweet and sour sauce. Follow the same baking instructions for a crispy, satisfying bite. The tofu absorbs the flavors wonderfully, providing a complete and hearty meal without the meat. This adaptation is not only tasty but also great for meal prep! Curious about other tofu recipes? You can explore this guide on cooking with tofu for more inspiration.
Cooking Tips and Notes for Baked Sweet and Sour Chicken
-
Perfectly Crispy Chicken: To achieve that delightful crispiness in your baked sweet and sour chicken, make sure to drain off the excess egg before coating the chicken in cornstarch. This helps the coating adhere better and offers a lovely texture.
-
Customize the Veggies: Don’t hesitate to mix up the vegetables! Broccoli, snap peas, or carrots can add a vibrant crunch and nutritional boost. For a quick guide on veggie substitutions, check out Vegetable Cooking Tips.
-
Sauce Balance: Feel free to adjust the sweetness and tanginess of your sauce. If you prefer a sweeter taste, add a touch more sugar; for extra zing, include a bit more vinegar. Cooking is all about personal preference!
-
Storage Tips: Leftovers can be stored in an airtight container in the refrigerator for up to three days. Simply reheat in the oven to maintain crispiness.
These tips will elevate your cooking experience, making your baked sweet and sour chicken not only delicious but also a joy to prepare!

Serving suggestions for Baked Sweet and Sour Chicken
Pairing with rice or cauliflower rice
For a delightful meal, serve your baked sweet and sour chicken over fluffy white rice or opt for a low-carb alternative with cauliflower rice. Both choices beautifully soak up the sweet and tangy sauce while balancing the savory flavors of the chicken. If you’re feeling adventurous, consider trying flavored rice options, like coconut or turmeric rice, for an exciting twist.
Creative serving ideas with sides
Elevate your dish by adding vibrant sides! Pair your baked sweet and sour chicken with steamed broccoli or snap peas for a nutritious touch. Alternatively, include a fresh cucumber salad drizzled with sesame dressing to complement the dish’s sweetness. For a complete feast, consider serving with crunchy spring rolls or crispy wontons, creating a mini Asian-inspired buffet at home. Check out some ideas for homemade spring rolls here.
Time Breakdown for Baked Sweet and Sour Chicken
Preparation Time
Getting ready for your baked sweet and sour chicken takes about 15 minutes. This includes chopping veggies, coating the chicken, and mixing up that delicious sauce. You’ll want to set aside a little time so everything runs smoothly.
Cooking Time
The cooking phase involves briefly sautéing the chicken, then baking it to crisp perfection. Expect to dedicate roughly 20 minutes of cooking time, with an additional 5 minutes for preparing the sauce and combining it all together.
Total Time
In total, you’re looking at about 40 minutes to whip up this scrumptious dish. Perfect for a weeknight dinner or impressing guests without the fuss! Afterward, you can enjoy your meal and a moment of culinary triumph.
For more cooking tips and delicious variations, check out this article on master cooking techniques or consider refining your skills with online classes like those offered by MasterClass. Happy cooking!
Nutritional Facts for Baked Sweet and Sour Chicken
When indulging in delicious baked sweet and sour chicken, it's great to know the nutritional breakdown. Each serving contains approximately:
- Calories: 528
- Protein: 42.7g
- Sodium: 825mg
This dish packs a protein punch while keeping calories in check, making it a flavorful yet nutritious option for any meal!
FAQs about Baked Sweet and Sour Chicken
Can I make this dish healthier?
Absolutely! To create a lighter version of baked sweet and sour chicken, consider using skinless chicken breasts and reducing the amount of sugar in the sauce. You can also swap traditional ketchup for a low-sugar alternative, and use less oil during the frying process. Incorporating more vegetables, like broccoli or snap peas, will enhance nutrition and flavor while keeping the dish vibrant.
How do I store leftovers?
Storing leftover baked sweet and sour chicken is a breeze! Simply transfer it to an airtight container and keep it in the refrigerator for up to 3-4 days. If you want to enjoy it later, you can freeze the chicken and sauce separately in freezer-safe bags. Just remember to let them cool before freezing!
What sides pair well with this dish?
For a well-rounded meal, serve your baked sweet and sour chicken with fluffy rice or opt for cauliflower rice for a lower-carb choice. Steamed vegetables or a fresh green salad with a light vinaigrette can also complement the flavors perfectly, adding a refreshing crunch to each bite. Looking for more side ideas? Check out this guide on perfect side dishes.
Conclusion on Baked Sweet and Sour Chicken
Baked sweet and sour chicken is not only a delicious twist on a classic dish but also a health-conscious option that doesn’t compromise on flavor. With crispy chicken coated in a zesty sauce, it's perfect for busy weeknights or meal prep. Try this recipe for a satisfying dinner that everyone will love!
For more cooking inspiration, check out Bon Appétit or visit Serious Eats for expert culinary tips!

Baked Sweet and Sour Chicken
Equipment
- Skillet
- baking tray
- Large ziplock bag
Ingredients
Chicken
- 1 lb chicken breast cut into bite size cubes
- ½ teaspoon salt
- 1 large egg or 2 small eggs, lightly beaten
- 1 cup cornstarch placed in a large ziplock bag
- 3 to 5 tablespoon oil (vegetable, canola)
- Oil spray
Stir Fry
- ½ tablespoon oil
- 1 clove garlic
- 1 small onion cut into large dice
- 1 can canned pineapple pieces (8oz/250g) in natural juice. Separate pineapple from juice.
Sauce
- ½ cup sugar (white or brown – I use either)
- ⅓ cup apple cider vinegar
- 2 to 3 tablespoon pineapple juice (from the canned pineapple pieces)
- 3 tablespoon ketchup (Australia: tomato sauce)
- 1 teaspoon Worcestershire sauce
- 1 teaspoon soy sauce
- 1 teaspoon Oyster Sauce
- ¼ teaspoon salt
Thickener
- 1 tablespoon cornflour (corn starch) + 4 tablespoon water mixed together
Instructions
Preparation
- Preheat oven to 200C/390F.
- Place chicken in a bowl, sprinkle with salt then add the egg. Mix to coat all chicken with egg, then drain out excess egg.
- Working a handful at a time, shake excess egg mixture off chicken then place chicken in ziplock bag. When all the chicken is in the bag, seal and shake well to coat chicken in cornflour. Discard excess cornflour.
- Heat oil in a large skillet on high. Add chicken (in 2 batches if your skillet is not big enough) and cook briefly for 2 minutes, turning, just to make the outside light golden and a bit crispy. The chicken should be raw inside.
- Transfer to baking tray, spray with oil and bake for 15 to 20 minutes until it becomes a little more golden brown and is crispy.
Sauce Preparation
- Meanwhile, discard oil in the skillet and wipe briefly with paper towels. Reduce heat to medium high and heat ½ tablespoon oil. Add garlic and sauté for 20 seconds, then add onion and cook for 2 minutes.
- Add bell peppers and cook for 1 minute.
- Add Sauce ingredients. Stir until sugar has dissolved and the sauce begins to bubble.
- Add Thickener. Bring to simmer, stirring constantly. Then cook until it thickens to a syrup consistency – about 3 minutes.
- Stir through pineapple pieces (just to warm) and remove from stove.
- When the chicken is done, add it into the skillet and toss to coat in the sauce.
- Serve immediately with rice – or for a low carb option, try Cauliflower Rice! Garnish with scallions if desired.


Leave a Reply