
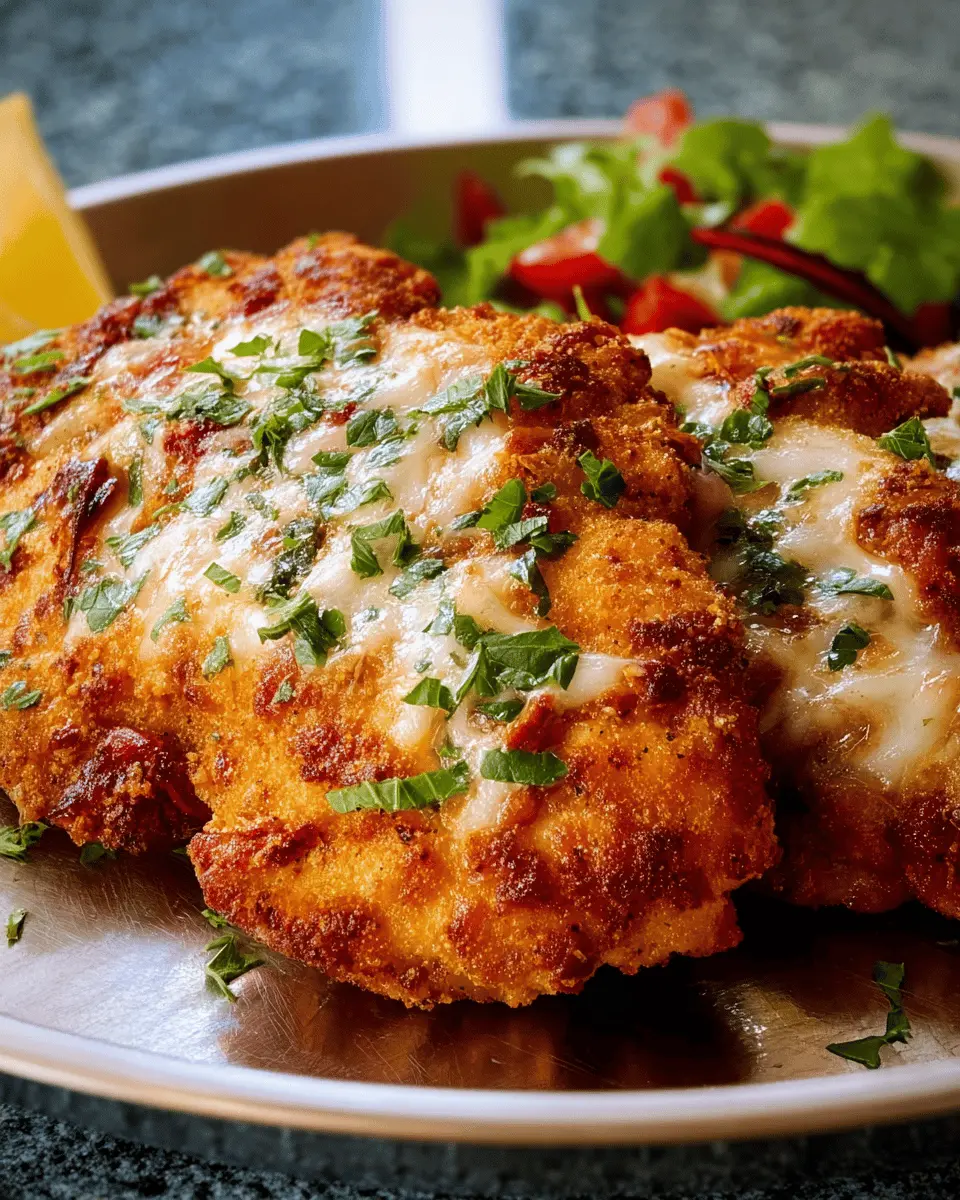
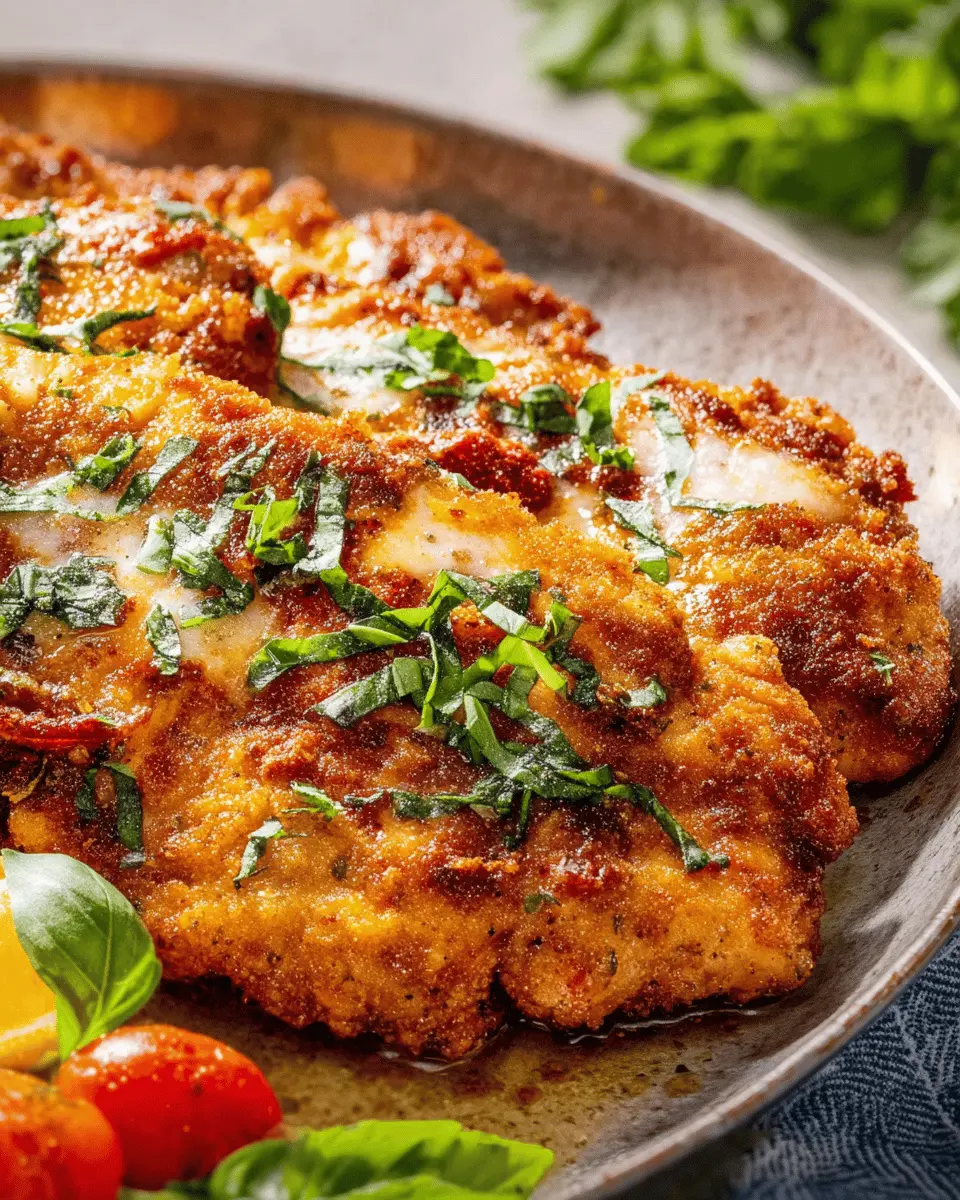
Introduction to Chicken Romano
If you're on the lookout for a new dish to impress family and friends, Chicken Romano is a fantastic choice. This savory Italian classic combines tender chicken cutlets with a crispy, flavorful coating that’s sure to satisfy even the pickiest of eaters. It's not just delicious; it's easy enough to whip up on a busy weeknight yet impressive enough for a special occasion.
Why You’ll Love Chicken Romano
So, what makes Chicken Romano stand out? First off, the combination of Pecorino Romano cheese and Italian-style breadcrumbs creates a mouthwatering crust that elevates the humble chicken cutlet to new heights. Each bite is a delightful mix of crunchy texture and rich flavor. Plus, it cooks quickly—perfect for those after-work dinner rushes!
But that's not all. This dish is highly customizable. Want to add a splash of lemon juice for brightness? Go for it! Looking for a light side? Pair it with a fresh salad or some sautéed veggies. The possibilities are endless.
Ready to bring some Italian flair into your kitchen? Let’s dive into the recipe and get cooking! For more tips on how to make the most of your chicken dishes, check out Bon Appétit’s chicken guide.
Ingredients for Chicken Romano
If you're looking to whip up a delightful dinner, getting the right ingredients for Chicken Romano is crucial! Let’s break down what you’ll need to get started on this flavorful dish.
-
4 chicken cutlets (about 1 ½ pounds): Choose fresh, high-quality chicken for the best flavor and tenderness.
-
1 teaspoon kosher salt: Essential for seasoning the meat, ensuring it’s bursting with flavor.
-
1 teaspoon freshly ground black pepper: You can adjust the amount based on your spice preference.
-
¼ cup all-purpose flour: This helps create a nice coating that contributes to the dish’s delightful crunch.
-
3 large eggs: These act as a binding agent, ensuring the breadcrumbs adhere beautifully to the chicken.
-
1 ½ cups Italian-style breadcrumbs: For that authentic Italian texture and taste.
-
¾ cup grated Pecorino Romano cheese: A deliciously salty cheese that takes the flavor up a notch.
-
1 teaspoon garlic powder: This adds a wonderful depth to your chicken.
-
Olive oil, for frying: A heart-healthy option to achieve that golden brown exterior.
Curious about how to prepare these ingredients? Check out our detailed method here!
Step-by-step Preparation of Chicken Romano
Creating a delicious Chicken Romano can be an enjoyable cooking adventure! With simple steps and a bit of care, you'll end up with golden, crispy cutlets that are bursting with flavor. Let's walk through the cooking process together, shall we?
Prepare the chicken
The first step in crafting your Chicken Romano is to prepare the chicken cutlets. Start by making sure your chicken is thawed if it was frozen.
- Place the chicken cutlets between two pieces of plastic wrap or parchment paper for easy cleanup.
- Using a meat mallet, rolling pin, or a heavy skillet, pound the chicken to a uniform ¼-inch thickness. This ensures even cooking.
- Once pounded, season the chicken generously on both sides with 1 teaspoon of kosher salt and ½ teaspoon of freshly ground black pepper.
- Next, sprinkle the all-purpose flour over the cutlets, turning them to coat evenly. Shake off any excess flour to prevent clumping, which can lead to a gummy texture when frying.
This step is crucial because a well-prepared chicken will create an excellent base for the crispy coating you’ll soon adore.
Bread the chicken
Now it’s time to add delicious flavor and texture to your properly prepared chicken! The breading process is essential for achieving that satisfying, crispy exterior characteristic of Chicken Romano.
- In a shallow bowl, whisk together the three large eggs with a pinch of salt and pepper until blended.
- In another shallow bowl, combine the Italian-style breadcrumbs with the grated Pecorino Romano cheese, garlic powder, and the remaining ½ teaspoon of pepper.
- Dip each cutlet first into the egg mixture, allowing any excess to drip back into the bowl before transferring it to the breadcrumb mixture. Gently press down on the breadcrumbs to ensure they adhere well to the chicken.
Did you know that the cheese not only adds flavor but also helps create that golden crust?
Pan fry the chicken
Frying brings everything together, transforming your breaded cutlets into a crunchy masterpiece.
- In a large, heavy skillet, add about ¼-inch of olive oil and heat over medium-high until it's shimmering. The right oil temperature is vital for achieving that perfect golden-brown crust.
- Working in batches, lay the breaded cutlets into the hot oil, making sure not to crowd the pan. Cooking time will typically be about 2 to 3 minutes per side, or until each side is golden and the chicken reaches an internal temperature of 165°F.
- If you notice the chicken browning too quickly, don’t hesitate to reduce the heat. Keep an eye on your cutlets; once cooked, drain them on paper towels to keep them crispy.
And just like that, you’ve created a stunning Chicken Romano! Serve it hot for a delightful meal that’ll impress your dining companions.
If you’re interested in more culinary tips, feel free to explore resources such as Serious Eats or The Kitchn for a wealth of cooking techniques and inspiring recipes! Enjoy your cooking journey!

Variations on Chicken Romano
Chicken Romano with a Twist
If you're looking to mix things up with your Chicken Romano, consider adding some fresh herbs or spices. For instance, try integrating lemon zest and fresh parsley into the breadcrumb mixture for a zesty kick. You might even experiment with sun-dried tomatoes or spinach for an unexpected flavor boost. Another delightful variation involves using mozzarella cheese instead of Pecorino for a gooey and comforting texture. For a Mediterranean flair, finish with a drizzle of balsamic glaze before serving.
Healthier Versions of Chicken Romano
Want to enjoy your Chicken Romano without the extra guilt? Opt for baked instead of fried for a lighter take, which cuts down on oil and calories. You can also swap in whole wheat breadcrumbs to increase fiber, or use almond flour for a low-carb alternative. Adding a side of roasted vegetables or a crisp salad can elevate the dish's nutritional profile. For more inspiration on lighter meals, check out Healthline’s guide on healthy eating.
By embracing these variations, you’ll transform a classic dish into something uniquely yours!
Cooking Tips and Notes for Chicken Romano
When making Chicken Romano, the key is to ensure each cutlet is evenly pounded to achieve that perfect crispiness. Here are some tips to elevate your dish:
-
Seasoning is crucial: Don’t skimp on the salt and pepper! A well-seasoned cutlet will enhance the flavors significantly. You can experiment with additional herbs like oregano or thyme for a unique twist.
-
Frying oil: Use a mix of olive oil and butter for that extra richness. This not only improves the flavor but also gives a nice golden-brown color.
-
Serve hot: Enjoy your Chicken Romano fresh from the skillet; it'll be juicier and the coating will stay crispy. For serving, consider a simple lemon wedge or a light salad to cut through the richness, like this Mediterranean salad.
These small tweaks can take your chicken dish from good to great!
Serving Suggestions for Chicken Romano
Chicken Romano is a culinary delight that pairs well with a variety of sides to elevate your meal. Here are some delicious serving suggestions to make your dish truly shine:
-
Simplicity with Pasta: Serve your Chicken Romano over a bed of buttery spaghetti or garlic-infused fettuccine. Toss with a splash of olive oil and fresh herbs for a bright touch.
-
Seasonal Vegetables: Roast or sauté seasonal vegetables such as zucchini, bell peppers, or asparagus. Their vibrant colors and flavors provide a healthy and visually appealing contrast.
-
Fresh Salad: A light side salad featuring mixed greens, cherry tomatoes, and a lemon vinaigrette complements the richness of the chicken beautifully.
-
Comforting Risotto: Pair your Chicken Romano with a creamy risotto. Mushroom or lemon risotto not only enhances the dish but adds a luxurious touch.
For more flavor ideas, check out this guide on perfect chicken pairings. Enjoy your flavorful feast with Chicken Romano!
Time Breakdown for Chicken Romano
Preparation Time
Getting started on your Chicken Romano is a breeze! Set aside about 15 minutes for prep. This includes pounding the chicken, seasoning it, and setting up your breading station so everything is ready when it's time to cook.
Cooking Time
Once you're prepped and ready, cooking your Chicken Romano takes approximately 6 to 8 minutes per batch. Depending on the size of your skillet and how many cutlets you can fry at once, aim for 15 to 20 minutes total.
Total Time
In just about 35 minutes, you’ll have a delicious dinner on the table! With 15 minutes for prep and around 20 minutes for cooking, it's perfect for a weeknight meal. Now that's what I call time well spent.
For more tips on delicious chicken recipes, you may want to check out this article that showcases various ways to prepare chicken. Happy cooking!
Nutritional Facts for Chicken Romano
When you're savoring a comforting dish like Chicken Romano, it's good to know what you're serving yourself. Here's a brief overview of its nutritional profile:
Calories
One serving packs approximately 380 calories, making it a satisfying yet manageable choice for dinner.
Protein
You’ll find about 28 grams of protein in each serving, an excellent way to fuel your day and aid muscle recovery post-workout.
Sodium
With around 750 milligrams of sodium, it’s wise to enjoy this flavorful dish in moderation, especially if you're watching your sodium intake.1
Incorporating Chicken Romano into your meal rotation not only tantalizes taste buds but also offers a balanced profile of nutrients to support an active lifestyle.
[1] More on daily sodium intake can be found on Healthline's guide.
The nutritional insights provided here help you make informed choices for a well-rounded diet, paving the way for delicious meals without sacrificing health. Enjoy your culinary creations!
FAQs about Chicken Romano
Can I use chicken breast instead of cutlets?
Absolutely! While chicken cutlets are ideal for making Chicken Romano, you can use chicken breasts. Just slice them into thinner pieces or pound them to achieve the desired thickness. This will ensure even cooking and help them absorb those delicious flavors.
What sides pair well with Chicken Romano?
When it comes to sides, you can’t go wrong with a fresh, crisp salad or sautéed vegetables. Here are some great ideas:
- Garlic mashed potatoes
- Steamed asparagus or broccoli
- A lemony arugula salad
- Pasta tossed in olive oil and herbs
These pairings complement the rich flavors of Chicken Romano beautifully!
How can I store leftovers of Chicken Romano?
If you have any leftovers (which is rare!), store them in an airtight container in the fridge for up to three days. To reheat, simply warm them in the oven at a low temperature to preserve their crispy texture. For longer storage, you can freeze them in a freezer-safe container for up to three months. Enjoy your delicious Chicken Romano again!
Conclusion on Chicken Romano
In conclusion, Chicken Romano is a delightful dish that combines crispy textures with rich, cheesy flavors. Perfect for weeknight dinners, this recipe is both simple and impressive. Serve it with a fresh salad or a side of pasta for a complete meal that your friends will love. Enjoy cooking!

Chicken Romano
Equipment
- meat mallet
- Rolling Pin
- heavy skillet
- shallow bowl
Ingredients
Chicken
- 4 cutlets chicken cutlets about 1 ½ pounds
Seasoning
- 1 teaspoon kosher salt plus more as needed
- 1 teaspoon freshly ground black pepper divided, plus more as needed
Breading
- ¼ cup all-purpose flour
- 3 large eggs
- 1 ½ cups Italian-style breadcrumbs
- ¾ cup grated Pecorino Romano cheese
- 1 teaspoon garlic powder
Oil
- Olive oil for frying
Instructions
Preparation
- Using a meat mallet, rolling pin, or heavy skillet, pound the chicken to a ¼-inch thickness and season all over with 1 teaspoon salt and ½ teaspoon pepper. Sprinkle the flour over the chicken and turn to coat, shaking off any excess.
Breading
- In a shallow bowl, whisk the eggs until blended and season with a pinch each salt and pepper. In another shallow bowl, combine the breadcrumbs, cheese, garlic powder, and ½ teaspoon pepper. Dip each cutlet in the egg mixture, allowing the excess egg to drip off, then add to the breadcrumb mixture, pressing so the crumbs adhere.
Cooking
- In a large heavy skillet, add ¼ inch of oil. Heat over medium-high until the oil is shimmering. Working in batches to avoid crowding, add cutlets to the skillet and cook until golden brown and just cooked through, 2 to 3 minutes per side. Reduce the heat if the chicken is browning too quickly. The chicken is done when it registers 165°F in the thickest part and is opaque and no longer pink when you slice into the center.


Leave a Reply